Grade 4 Art Lessons
6-9-20 Grade 4 Art Lesson
Today we will have some fun tracing our feet to make a colorful pair of flip flops for our final art project for the school year. I have also included a farewell video for all of you soon to be Middle Schoolers.

6-2-20 Grade 4 Art Lesson
Today we will draw our names using ancient Egyptian hieroglyphics. Hieroglyphics were symbols that the ancient Egyptians used as their formal writing system. Use the alphabet and cartouche pattern PDF files to the right, or the table below, to help you to draw your name in hieroglyphics inside the cartouche symbol.
https://www.britannica.com/video/179443/overview-pyramids-discussion-Egypt-hieroglyphics
This National Geographic video gives a great summary of Ancient Egyptian history and the development of hieroglyphics.
https://www.youtube.com/watch?v=hO1tzmi1V5g


5-26-20 Grade 4 Art Lesson
Today we will be using our traced hand to do some Zentangling. Zentangle is a method of drawing continuous patterns, or doodles, to help you to relax. The idea is that you are focused on each pattern and not on the overall appearance of the drawing. Below the videos, I will include a menu of some patterns, but you can find many examples of Zentangle patterns online.
This next video shows another example of a Zentangle hand.
https://www.youtube.com/watch?v=qBwHUKHUdD8
This videos demonstrates drawing 15 different Zentangle patterns.
https://www.youtube.com/watch?v=s8PpYI3cPbE
After you have traced your hand you may want to divide the tracing into sections like the first picture below. Then add your patterns to each section.

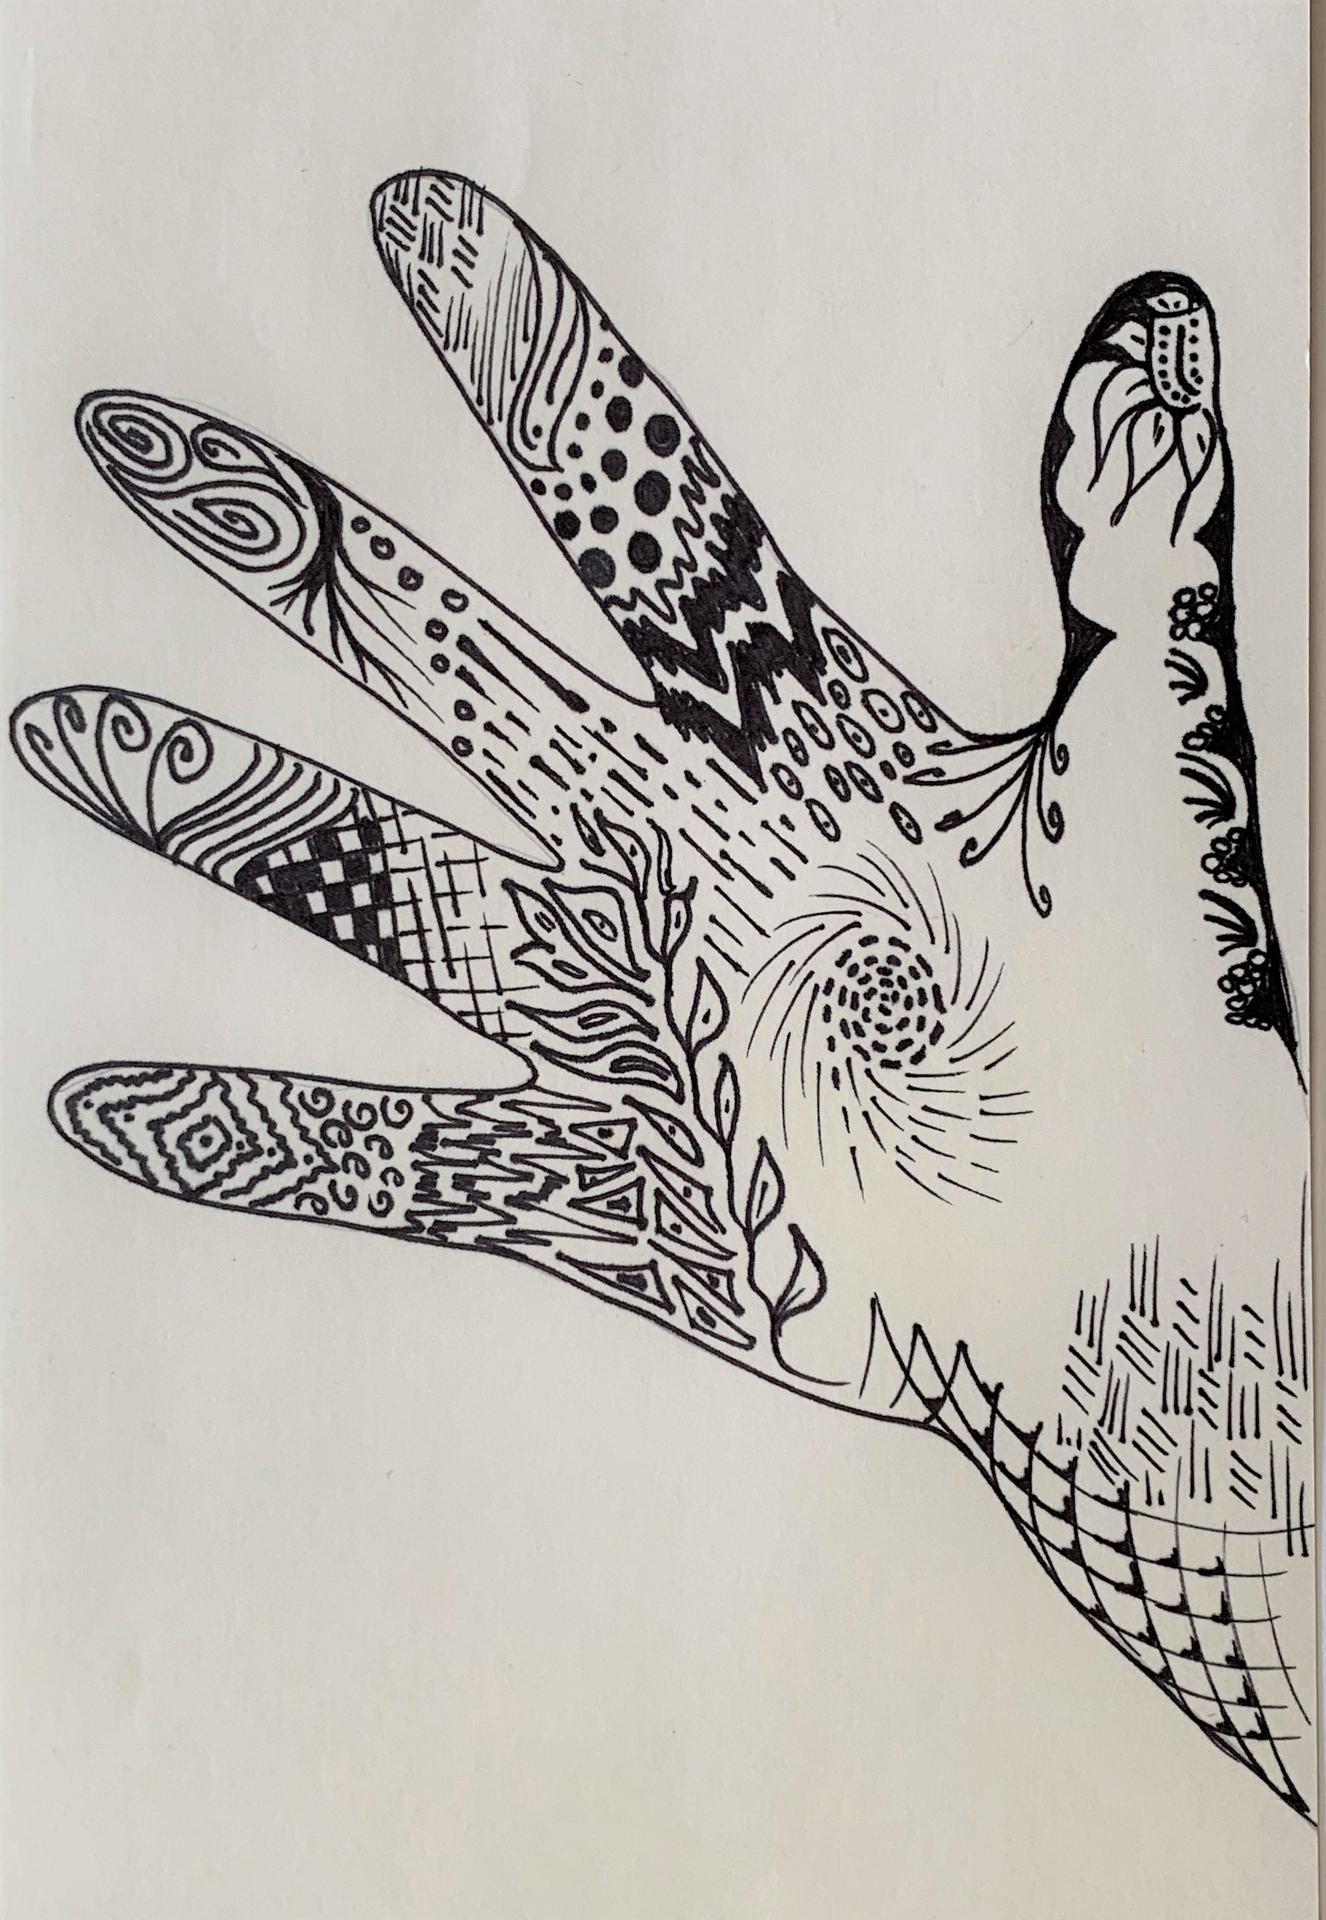
Here are some examples of simple Zentangle patterns. Remember, use shapes and lines to make a pattern.

5-19-20 Grade 4 Art Lesson
In today's lesson we are going to have fun with letters and symmetry. I have included an attached image of my example and an image of the first step in case it is difficult to see the fold lines in my video.
This is a wonderful video showing symmetry in nature.
https://www.youtube.com/watch?v=KMC_1dVtd4c
This website lets you draw radial symmetrical designs.
https://www.myoats.com/create.aspx?


5-12-20 Grade 4 Art Lesson
Please complete this lesson on Tuesday 5-12.
In our last lesson we explored some paper sculpting by folding. Today we will use paper to make some origami animals. Remember, Origami is the art of paper folding. In this lesson we will make an origami turtle and elephant. You do not need special origami paper to make these. Have fun!
This next video introduces us to the amazing work of Tomoko Fuse.
https://www.youtube.com/watch?v=0g-y5825Xkk
Watch this beautiful video about the history of Origami.
https://www.youtube.com/watch?v=w0IcsQnGk6c
Origami Facts
- Origami is the ancient Japanese art of paper folding.
- The name origami comes from two Japanese words ‘ori‘(to fold) and ‘kami ‘(paper).
- The, kami,also means ‘spirit’ or ‘god’ and origami was first used only for religious ceremonies.
- The origami that we know today is greatly influenced by the master origami artist Yoshizawa Akira. For centuries, the same traditional folds were made but in the 1950s he published books showing many more models of origami other than the traditional ones. This reintroduced origami to people around the world.


5-5-20 Grade 4 Art Lesson
Complete only this lesson for today.
Use colored paper to cut and fold using the examples below. Glue these folds to another paper to create a paper sculpture.
Watch this video of amazing Paper Sculpture artist Yulia Brodskaya.
https://www.youtube.com/watch?v=OqErWY7OKMs


4-28-20 Grade 4 Art Lesson
Complete only this lesson for today.
In this lesson try to complete the rest of your drawing. If you are doing a great job, these should take some thought and time. Here are instructions if you would like to take the challenge and make three dimensional letters.
This is a helpful video which shows how to make big, bold letters.
https://www.youtube.com/watch?v=lK-yBU9k27w
I used colored pencils in my example below.


Elements of Art
- Line – a line is a path of a moving point. Lines can appear in many ways, such as wavy, straight, zigzag, and move in different directions like horizontal, vertical, diagonal. They define the edges of shapes and forms, that is, two-dimensional and three-dimensional art.
- Shape – Shapes are flat. They can be geometric, like squares, circles, triangles, or free form organic shapes which appear in nature and do not follow rules like geometric shapes.
- Color – Color is seen by the way reflects off a surface. Primary colors red, yellow, and blue make secondary colors orange, green, and violet by mixing them. Tertiary colors are made by mixing a primary color with a secondary color, such as red-orange, yellow green.
- Value – Value is how much of a color is present. We use value when shading in drawing. When white is mixed with a color a tint is made. When black is mixed with a color a shade is made.
- Form – Form is three-dimensional. Three-dimensional art is called sculpture.
- Texture – Texture is how something feels or looks in Art. We draw and paint to simulate how texture might feel.
- Space – Space is an illusion of depth. We use linear perspective to create this illusion like making things look smaller to look further away or by overlapping to make one object appear to be in front of another.
4-21-20 Grade 4 Art Lesson
This is a neat video about the elements.
https://www.youtube.com/watch?v=1rCBFV6ttjo
Use a larger piece of paper, such as 12” x 18”, or tape two pieces of 8½ ”x 11” together. Using a ruler, make a point right in the middle of the top and bottom of your paper. If your paper is 18” long, you need to divide 18 by 2. The dots will be made at 9”. Using the ruler connect the dot to the opposite side’s corners. You should have a large triangle on your paper. Do the same for the other side. Now you have a diamond shape in the middle, and six triangles surrounding it. Write each element of Art in one of the sections on your paper. I used a sharpie for this. Now using a pencil, colored pencils, markers, crayons, whatever you have at home, illustrate each element.
For this lesson set up the lines, words and complete only three sections of the drawing.
Do not work on the diamond. I will demonstrate how to do the three-dimensional lettering in lesson 2.

Enter Title
Enter Title

